When you turn on a garden sprinkler, the timer sends an electrical pulse to a solenoid that lifts a steel plunger, venting the bonnet chamber. This pressure drop lets water push a diaphragm off its seat, opening the valve and sending pressurized water up the riser, which overcomes spring tension to pop the head up. The water then flows through a nozzle or rotor, shaping the spray pattern, while a regulator maintains consistent PSI and prevents backflow. Keep going to uncover more details.
What Happens When You Turn On a Sprinkler System?
When you flip the switch, pressurized water stored in the main supply lines rushes through the network of pipes, instantly reaching every sprinkler head. The system maintains constant pressure, so water arrives without delay, and each head’s valve opens in response to the pressure surge. Because heads operate independently, only those nearest a heat source discharge, limiting water use and improving water conservation metrics. Sensor based maintenance triggers monitor pressure and flow, flagging deviations that could indicate leaks or blockages. The architecture—wet‑pipe or dry‑pipe—determines whether water is pre‑filled or released on demand, but both designs preserve readiness. Automatic shutoff follows temperature drop, while manual control ascertains oversight if sensors fail. Sprinklers are typically set to activate at 155 °F to protect against fire hazards. A sprinkler head will only discharge when its thermal element reaches a temperature high enough to melt the fusible link. The wet‑pipe system provides rapid activation and reliability in most climates.
How a Timer Triggers the First Sprinkler Zone
You set the timer, and at the programmed start time it sends an electrical pulse through the wiring to the first zone’s valve. The pulse travels along the manifold’s low‑voltage conductors, delivering precise electrical signal timing that the first valve interprets as a command to open. When the valve opens, water pressure builds, and the sprinkler head emerges to water the zone. After the programmed run time expires, the timer issues a closing pulse, cutting power to that valve. The pump then shuts off briefly, and the timer advances to the next valve, initiating sequential zone activation. Each zone follows the same pattern, ensuring only one zone waters at a time while the system progresses automatically through the programmed schedule. The timer’s 24‑hour dial rotates to activate the appropriate pins for each day, allowing the system to follow the weekly schedule without manual intervention. Modern controllers often incorporate low‑voltage DC power supplies to improve energy efficiency and enable battery or solar backup. Check for wiring issues regularly to prevent intermittent failures. Properly sealing the connections helps avoid moisture intrusion, which can cause corrosion and reduce reliability.

Professional Grade: 18-gauge copper conductors with color-coded insulation for easy valve identification
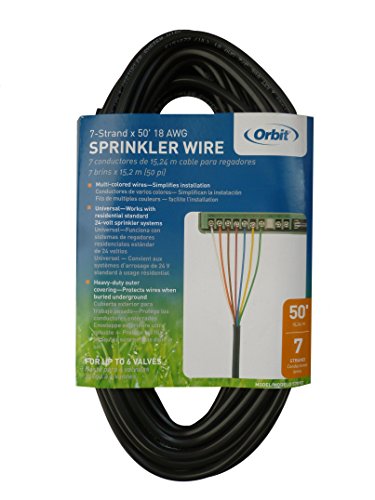
Professional Grade: 18-gauge copper conductors with color-coded insulation for easy valve identification

Professional Grade: 18-gauge copper conductors with color-coded insulation for easy valve identification
What Happens Inside a Sprinkler Valve When It Opens
Some of the key actions happen inside the valve the moment the solenoid receives its activation pulse. You first see an electrical signal energizing the coil, creating a magnetic field that lifts the steel plunger. The plunger movement mechanics shift the plunger upward 1–3 mm, unseating the pilot port and venting pressure from the bonnet chamber. With the pilot pressure released, water pressure below the diaphragm exceeds the pressure above it, so the diaphragm lifts off the valve seat. The main flow path opens through the valve body, allowing water to surge toward the zone. As the diaphragm rises, the valve seat clears, and the system reaches full flow within a second, ready to irrigate the garden. This rapid response is enabled by the spring‑loaded diaphragm that returns the valve to its closed position when the signal ends. In many systems, a pressure regulator is integrated to maintain consistent flow despite fluctuating supply pressure. The main pipe delivers the water from the source to the valve, ensuring sufficient pressure for activation.
How Pressurized Water Lifts Pop‑Up Sprinkler Heads
If the system maintains the ideal 30 PSI range, pressurized water forces the stainless‑steel riser to overcome the spring’s tension, lifting the sprinkler head until the wiper seal clears the ground. You then monitor the pressure regulator, which clamps the flow to 30 PSI for standard nozzles and 40 PSI for rotators, preventing misting while ensuring sufficient lift. Riser height adjustments let you select 2‑, 3‑, 4‑, 6‑, or 12‑inch extensions, matching terrain clearance and desired spray radius. Spring performance optimization hinges on the corrosion‑resistant steel spring’s tension, which must balance water force for smooth extension and reliable retraction. The silt trap at the base guards the spring from debris, maintaining consistent pop‑up action across cycles. MP rotors use half the amount of water per minute compared to stationary heads. Properly sizing the system based on sprinkler head flow rates ensures the overall water demand does not exceed the supply capacity. Efficient irrigation also relies on soil moisture sensors to adjust watering schedules based on real‑time moisture levels.
How Nozzles and Rotors Shape the Sprinkler Spray Pattern
When water exits a sprinkler, the nozzle or rotor determines the shape, reach, and uniformity of the spray, so selecting the right type is essential for precise irrigation. You’ll notice that fixed pattern nozzles lock a nozzle pattern shape—full, half, quarter, strip, or square—by aligning the stem’s left edge (L or O) and tightening the collar. Adjustable arc nozzles let you rotate the collar 0‑360°, fine‑tuning the arc on the screw. Rotary nozzle operation differs: MP rotors emit finger‑like streams, while gear‑driven rotary heads spin multiple jets in a spiral, covering large zones with lower precipitation rates (e.g., 0.32 GPM at 180°). Adjust arcs by turning the center cap clockwise, then left, and set the throw angle to 90° or 180° as needed. Avoid over‑tightening to prevent thread damage and pattern distortion. Nozzles marked with throw pattern and distance make it easy to match the sprinkler to specific landscape requirements. Understanding flow rate helps you balance water usage with coverage efficiency. Selecting a nozzle with a larger or can increase the flow speed for faster irrigation. Maintaining consistent pressure throughout the system further ensures steady, uniform flow and minimizes turbulence.

ADJUSTABLE SPRAY PATTERN FROM 0–360°: Quickly set the arc to match any area — from narrow strips to full circles. No tools needed, just twist and go.
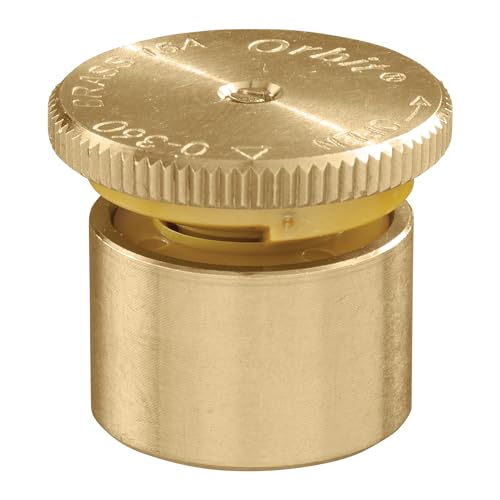
UNIVERSAL COMPATIBILITY: Designed to fit all major brands of pop-up spray heads, making it easy to replace existing nozzles and maintain your irrigation system. Delivers up to a 15-foot spray distance for efficient landscape watering (distance may vary based on PSI and other factors).

PRECISION ARC CONTROL FROM 0° TO 360°: Get pinpoint accuracy for any zone shape or edge. Whether you're watering a narrow walkway or full lawn circle, fine-tuned arc settings ensure no water is wasted.
How Regulators Keep Pressure Even (and Stop Backflow)
Regulators act as the system’s pressure gatekeepers, automatically throttling flow to maintain outlet pressure steady despite fluctuations in inlet pressure. You’ll notice the T‑stem and diaphragm work together: rising inlet pressure compresses the spring, pulling the T‑stem toward the fixed seat and narrowing the opening. This action preserves outlet pressure within the target range, typically 30‑40 psi for sprinklers, by regulating pressure changes in real time. Adjustable regulation settings let you fine‑tune the spring preload, matching the regulator to your specific flow (0.5‑15 gpm) and elevation profile. The diaphragm’s balance of spring force and water pressure prevents surges that could cause backflow or blow‑out of fittings. By installing the regulator after the main valve, you protect low‑pressure zones, preserve component life, and guarantee uniform water distribution across the garden. Directional flow is essential, so the regulator must be installed with the arrow pointing in the direction of water movement. Properly maintained backflow preventers, such as double‑check valves, further safeguard the potable supply from contamination. Local codes often mandate a backflow preventer for any irrigation system that connects to a municipal water supply. A backflow preventer is required when the hose is attached to a potable water source to stop contamination risk.
Why Rain Sensors and Wi‑Fi Improve Your Sprinkler System’s Timing
Because rain sensors and Wi‑Fi controllers work together, they let you fine‑tune irrigation timing to actual weather conditions rather than a fixed schedule. You set a moisture threshold—1/8 to 1/2 inch—so the sensor halts water flow instantly when rain meets that level. The Wi‑Fi module receives the sensor’s signal, then applies a programmable dry‑out interval or a 1‑7‑day delay based on real‑time forecasts. This integration yields seasonal adjustability, letting you tighten schedules in wet spring or broaden them in dry summer without manual rewiring. Installation versatility comes from wireless sensors that sit up to 300 feet from the controller, avoiding trees or walls, while wired options plug directly into Rain Bird or Hunter units. The system automatically syncs with weather stations, reducing waste by 20‑50 % and preventing freeze damage via alerts. Clear sky placement ensures the sensor receives accurate precipitation data. Adding a soil‑moisture sensor can further refine watering by measuring ground moisture directly. Proper soil moisture detection helps prevent over‑watering on days with lingering dampness. The controller’s diagnostic display can also indicate sensor errors, making troubleshooting faster.

【APP Remote Control】Use the Smart Life APP to add the WiFi Water Timer to your WiFi hub (2.4 GHz WiFi only) so you can create watering schedules anytime, anywhere. The WiFi Sprinkle Timer connects to the gateway via RFID technology and supports longer distances (up to 196 ft.), providing a more stable signal than a Bluetooth connection. So you can travel with confidence! Note: Not compatible with tablets.

【Smart App & Voice Control】Control your wifi water timer from anywhere using Smart Life/Tuya app (2.4GHz WiFi). Set schedules, start or stop watering, and manage your irrigation timer with Alexa or Google Assistant for hands-free convenience
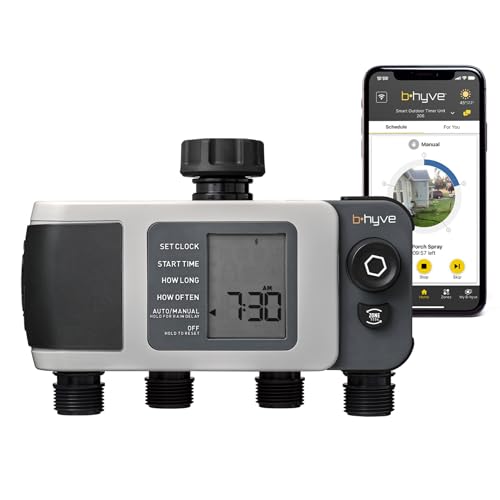
Automated Smart Watering: The Orbit 4-Port Smart Hose Watering Timer delivers effortless auto watering through an intelligent watering timer system
Startup Steps to Seat the System and Stop Leaks
You’ll begin by confirming the site is frost‑free, digging a 12‑inch test pit, and inspecting the backflow preventer for cracks or leaks before any water runs. Conduct preemptive system checks: close petcocks with a flat‑head screwdriver, verify test cock valves are sealed, and guarantee the drain next to the main valve is closed. Open the main sprinkler valve slowly over 30–60 seconds, listening for air release and avoiding water hammer. After pressure stabilizes, seat the vacuum breaker by turning the entrance side on, then open the second isolation valve while watching for drips. Switch the controller to manual mode, run each zone for two minutes, and adjust heads with pliers and a screwdriver. These seasonal maintenance habits lock the system and stop leaks. Turn the petcocks perpendicular to the water flow before opening the main valve.
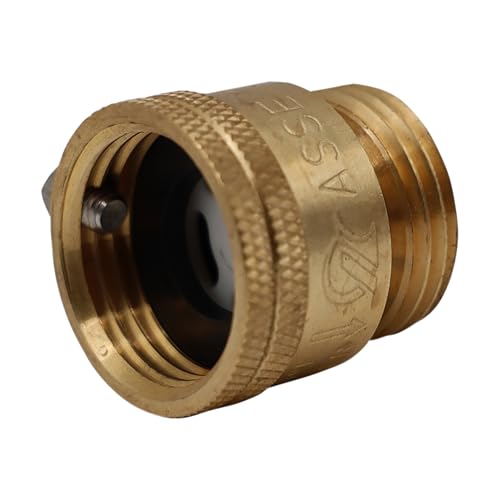
SOLID BRASS CONSTRUCTION: Built from high-quality, lead-free solid brass for maximum durability, corrosion resistance, and long-lasting outdoor use.

[Anti-Siphon Protection for Safe Water Supply]Reliable hose backflow preventer that automatically stops siphoning when pressure drops, protecting your clean water supply. Easy to connect to faucets, hose bibs, and drip irrigation systems, built to meet standard irrigation safety requirements

STOP CONTAMINATED WATER BEFORE IT SPREADS — A pressure loss lets dirty irrigation water siphon back toward your source. This brass pressure vacuum breaker seals the line instantly, protecting lawn, garden and greenhouse zones from fertilizer or pond runoff.


