Turn off the main water supply and confirm zero pressure by opening a downstream faucet, then gather an adjustable wrench, pipe cutter or hacksaw, safety glasses, gloves, pipe thread seal tape, and the appropriately sized cap. Locate the sprinkler head using the system map, expose it with a narrow trench, and remove it with pliers, turning counter‑clockwise and cleaning the threads. Match the cap’s color rating, tighten it with the wrench, and apply PVC primer and cement before letting it cure. Follow the next steps to test for leaks and finish the installation.
How to Cap a Sprinkler Head – Step‑by‑Step Overview
A few simple steps will let you cap a sprinkler head safely and efficiently. First, grab a small shovel and dig a 1‑2‑inch radius around the head, 6 inches deep, exposing the riser and lateral pipe without damaging surrounding soil. This access lets you keep the sprinkler system operational while you work and helps prevent accidental puncture of nearby lines. Next, unscrew the head counter‑clockwise, holding the cap and assembly together to avoid dropping parts. Leave 1‑2 inches of pipe at the T‑section, then cut the pipe cleanly with a cutter, marking the section with tape for accurate cap placement. Wrap Teflon tape on the threads, screw a matching PVC cap tightly—no overtightening—and finally, test for leaks before backfilling. Before you start, remember to call 811 to locate any underground utilities and avoid damaging them. You can also use a metal detector to confirm there are no hidden lines nearby before digging. A metal detector can also help you locate buried sprinkler heads quickly.
Turn Off the Water and Gather Your Tools
Turn off the main supply before you start. Locate the shut‑off valve for the irrigation zone and rotate it clockwise until it stops; verify zero pressure by opening a downstream faucet. This step guarantees the turning off sprinkler system eliminates any risk of accidental spray while you work. Next, begin gathering necessary tools. You’ll need an adjustable wrench, a pipe cutter or hacksaw, a flat‑head screwdriver, a pipe thread seal tape, and a cap appropriate to the head’s size. Wear safety glasses and gloves to protect against debris and sharp edges. Arrange the tools on a clean surface, keep them within arm’s reach, and double‑check that the valve is fully closed before proceeding to the next phase. Remember to drain the backflow preventer to avoid freeze damage. Avoid exposing exposed pipes to temperatures below 20 °F to prevent freezing. Faulty valves can cause leaks even when the system is off. Check the irrigation schedule before you begin to ensure no automatic cycles will start while you work.

Made in the USA

ADJUSTABLE SIZE: Libraton Rubber Strap Wrench Set includes two different sizes wrenchs. The large wrench is adjustable from 38mm/1.5-inch to 150mm/6-inch, thickness 5mm/0.2-inch. The small wrench is adjustable from 10mm/0.39-inch to 100mm/4-inch, thickness 3mm/0.1-inch.
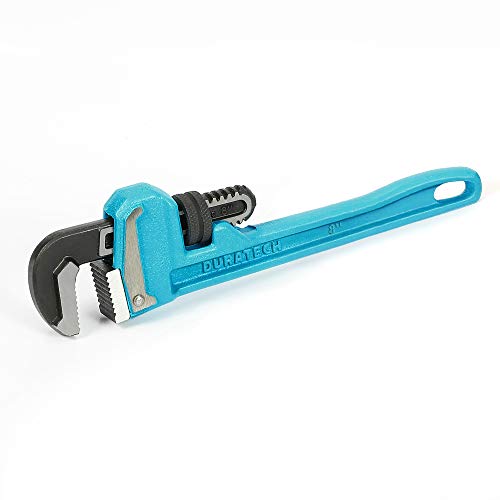
Heavy-duty pipe wrench with sturdy cast-iron body protects the tool from damage in harsh conditions. The 8-inch pipe wrench has slim profile wrench head that makes it easier for you to access tight spaces and overhead applications. The pipe capacity is 1/8"-1".
Locate and Expose the Sprinkler Head Safely
Now that the water’s shut off and your tools are ready, locate the exact spot of the hidden head before you start digging. First, consult the irrigation system map; flag each visible head, then cross‑reference to infer missing locations. Measure distances between flagged heads to establish average spacing, noting any unusually large gaps that suggest a buried head. Observe water patterns and listen for trickle sounds when you briefly run the system—these cues help you pinpoint the spot while you locate visual obstructions. Use a garden rake or a thin metal detector probe to feel for the metal nozzle, marking the precise point with a flag or spray paint. When you begin to expose the head, dig a narrow trench, removing only the necessary soil to minimize surface damage and protect surrounding landscaping. The buried head was found about 2.5 inches below the surface. Proper depth ensures optimal water distribution based on soil type and plant needs. Burying sprinkler lines at a depth of 6 to 12 inches helps maintain consistent pressure and protects against frost damage. Regularly checking the system for leaks can prevent water loss and reduce the risk of freeze damage during winter.
Remove the Existing Sprinkler Head Without Damaging the Riser
Before you start, make sure the irrigation system is shut off and the sprinkler head’s base is fully exposed by digging a tidy 6‑8‑inch trench around it. Use a shovel or garden spade to cut an 8‑inch‑diameter, 2‑8‑inch‑deep circle, keeping sod intact and scooping soil for later replacement. Grasp the cap and riser firmly with large Channellock pliers—this is proper tool usage—to reveal the internal splines. Insert the sprinkler adjustment tool between the splines, ensuring a snug fit, then twist counter‑clockwise slowly. If hand‑turning stalls, apply the pliers gently; avoid excessive force to protect the riser threads. Once the head releases, pull it straight out, clean the pipe threads with a towel, and flush the line briefly to clear debris. This systematic approach follows proven sprinkler head removal techniques while safeguarding the riser. Debris buildup can cause the head to seize, so inspect the line for any accumulated particles before removal. Properly checking for clogged pipe can prevent future leaks and ensure smooth operation. High water pressure may also contribute to head seizure, so verify pressure settings before beginning the removal.

---US Patent Pending---

Handy tool makes working on pop-up sprinklers easy

2.75" Sprinkler Head grass Trimmer: Engineered as a high-performance sprinkler head grass cutter, this 2.75" stainless steel sprinkler sod cutter delivers clean, accurate trimming around sprinkler heads without damaging surrounding turf.
Select and Install the Correct Cap With a Wrench
How do you guarantee the cap fits securely while maintaining fire‑rating compliance? First, identify the cap’s color coding to match the sprinkler’s temperature rating—red for 135 °F, blue for 175 °F, etc. Select the Model W3 wrench, designed for flat‑plate concealed heads, and attach it to the CPVC pole. Apply the wrench positioning technique: align the wrench’s flat side with the cap’s angled projection, then push firmly until the indicator aligns with the nominal ceiling finish. For a push‑on cover plate, maintain steady pressure; for a threaded plate, rotate the wrench clockwise, ensuring the 1/2″ NPT/BSPT adapter seats fully. Verify that the cap projects beyond the cup without contacting the ceiling, and double‑check that the color code matches the required fire‑rating. Always consult the system’s manufacturer specifications before proceeding. Red pipe markings indicate compliance with fire‑code identification standards.

For installing and maintaining pop-up and non-pup-up flush head sprinklers
For installing and maintaining pop-up and non-pup-up flush head sprinklers

Keyfit Tools Head Wrench Made For Irrigation Professionals, Sprinkler Tool Engineered specifically for ALL sizes & ALL brands of rotor heads, spray heads & jar top valves up to 4" in diameter.
Apply Slip‑End Caps and PVC Glue for Winterization
After securing the cap with the Model W3 wrench, you’ll move on to winterizing the line by fitting slip‑end caps and applying PVC cement. First, don gloves gloves and work in a well‑ventilated space; the primer and cement emit strong fumes. Apply a thin coat of purple PVC primer to the pipe’s exterior and the cap’s interior, ensuring even coverage without drips. While the primer stays wet, spread medium‑clear Oatey cement on both primed surfaces. Twist the slip‑end cap onto the pipe, hold for 30 seconds, then wipe excess cement with a clean rag. Allow a 24‑hour cure, then cover the joint with moisture barriers and pipe insulation to protect against freeze‑thaw damage. Blank nozzle can be used on any brand of sprinkler. Proper winterization prevents water from freezing inside the pipe, which can cause burst pipe and costly repairs. Inadequate drainage can lead to frozen pipe damage that compromises system integrity. Using a water‑tight seal helps guard the valve against debris and weather exposure.

Specifications – Accurate 1/2" BSPT Size:1/2 inch BSPT female thread end cap (not NPT). Connection Type is BSPT.suitable for closing the end of 1/2" male threaded pipes or fittings.📌 To avoid size mismatch: this cap is not designed for 1/2" copper pipe or 3/4" sprinkler connections.

1/2" BSPT Size – Check Your Inner Diameter First: This cap fits 1/2 inch BSPT female thread (British Standard Pipe Tapered). The actual inner diameter is approx. 20mm – not 15mm, not 25mm. ✅ How to check: Measure the inside of your female cap or the outside of your male pipe. If your male thread measures about 20mm across the outer diameter, this 1/2" BSPT cap is correct. ❌ Will not fit: 1/2" NPT threads, 1/2" copper pipe, or 3/4" sprinkler connections. Please confirm your thread type before ordering.

Durable PVC Material: Made from high-quality PVC, our 3/4 inch end caps feature a glossy finish that resists yellowing and withstands impacts, ensuring long-lasting durability.
Turn Water On and Test Capped Sprinkler Head for Leaks
When you restore the water supply, turn the main valve on slowly to prevent pressure surges. Reactivate water supply by opening the irrigation valve a quarter turn, then wait two minutes for the main line to fill. Observe water pressure on the controller and listen for steady flow. Select the zone containing the capped head and activate it. Inspect the ground around the cap for bubbles, pooling, or gushing water. If you hear continuous running or notice a pressure drop, tighten any loose fittings immediately. Verify the backflow preventer and anti‑siphon valve engage correctly. Perform a second activation to confirm the leak is resolved before moving to the next zone. This procedural check guarantees the capped sprinkler head remains sealed under operating pressure. Check for leaks throughout the summer to ensure the cap stays secure. Properly tightening fittings prevents accidental water loss during seasonal changes. Longer hose runs can cause additional friction loss due to increased resistance, which may affect overall system pressure. Consider installing a pressure‑boosting device if the flow remains weak after all other checks.
Finalize the Capped Sprinkler Head by Burying the Pipe
Begin by confirming the capped fitting is still accessible—mark its spot with a flag or paint, clear away loose dirt, and verify the pipe sits at the standard 8‑12‑inch depth. Remove debris, check for sharp rocks, and guarantee the cap is tight with Teflon tape. Then backfill in 4‑6‑inch layers, using native soil to preserve backfill soil quality. Lightly tamp each layer with a hand tamper, avoiding heavy machinery that could crush the pipe. Probe for voids before the final layer, then compact to 95 % of the original density for stability. Grade the surface to match the lawn, add 2‑4 inches of topsoil, reseed, and apply a thin mulch layer. Record the location on your system map; this supports longterm sprinkler maintenance. Flex Pipe Connection allows post‑installation adjustment if the head needs repositioning.
Common Mistakes to Avoid When Capping Sprinkler Heads
Why risk leaks or damage? First, verify pipe diameter before purchasing pre‑approved caps; a mismatched cap won’t seal and pressure the entire system. Next, clean the line thoroughly—remove debris, old sealant, and dirt—to guarantee threads engage fully. Then, apply Teflon tape or pipe sealant; skipping this step leaves micro‑gaps that cause drips. When you unscrew the sprinkler head, turn it slowly and evenly to avoid cracking surrounding fittings. After installing the cap, turn the water on and inspect for any seepage; inadequate testing can hide failures until they damage the landscape. If you’re unsure about sizing, sealants, or testing procedures, consulting an expert prevents costly rework and keeps the irrigation network safe. Capping also prevents the need to bust concrete later if the area is permanently covered.

❤Superior Quality: ❤Thread sealant tape is made of teflon,is suitable for most kinds of soft water pipes, creating airtight seals between threaded pipes and fittings,the good density is 4 times heavier than standard tapes; Teflon tapes will not harden or crack anytime; They have the good characteristics of corrosion resistance, anti-aging,helps prevent leaks on pipes and plumbing.

❤Superior Quality: ❤Thread sealant tape is made of teflon,is suitable for most kinds of soft water pipes, creating airtight seals between threaded pipes and fittings,the good density is 4 times heavier than standard tapes; Teflon tapes will not harden or crack anytime; They have the good characteristics of corrosion resistance, anti-aging,helps prevent leaks on pipes and plumbing

Teflon tape has a sealing function to prevent the leakage of water or gas.


