You should winterize your sprinkler system because frozen water expands up to 9 % in volume, which can burst pipes, crack valves, and damage heads, leading to costly spring repairs. A proper blow‑out or drainage removes water before it freezes, protecting underground lines and above‑ground components. Timing depends on regional frost depth, but you generally start when temperatures approach the frost line and finish before consistent sub‑32 °F nights. Follow the step‑by‑step shutdown process to avoid ice damage and keep your system ready for spring.
Does a Sprinkler System Need Winterization?
One of the most critical questions you’ll face each fall is whether your sprinkler system needs winterization. You must evaluate sprinkler maintenance requirements against regional frost risk. First, shut off the main water supply and the irrigation controller. Then, open manual drain valves to release water, or activate an automatic‑drain system if installed. Apply cost effective winterization techniques: use a blow‑out with compressed air to purge residual water, and cover exposed PVC pipes, backflow preventers, and above‑ground components with insulation. Label each valve for spring restart. Skipping these steps invites pipe cracks, valve bursts, and costly repairs, shortening system lifespan and damaging grass. Follow this directive protocol to protect your irrigation assets through winter. Water expansion in frozen pipes can cause catastrophic damage. Properly draining the system reduces the risk of frost‑related pipe bursts during cold snaps. Understanding the freeze‑point temperature helps you schedule the blow‑out before water reaches 32°F (0°C).
How Frost Depth Determines When to Winterize Your Irrigation
After confirming that your system needs winterization, you must gauge the local frost depth to set the exact timing. Use regional frost depth patterns to decide when to start preparing an irrigation system. Consult climate data and local building codes; most northern zones require action before the first sustained sub‑32°F night. Monitor ground temperature trends—soil lags air, so begin the blow‑out when air reaches freezing but before the frost line reaches pipe depth. In Mountain West areas, initiate in early October; in milder regions, wait until the first frost. Align your schedule with subsurface freeze advance, not just surface air, to prevent ice‑induced pipe bursts and warranty violations. Proper winterization also protects the system’s control valves from freezing and cracking. Uneven watering often signals a valve that may be compromised by freeze damage. Installing valves at the recommended 12–18 inches above ground helps maintain consistent pressure and reduces the risk of freeze‑related failures.
Winterization Drain Options: Manual, Automatic, or Blow‑Out
Three main approaches—manual drain, automatic drain, and blow‑out—cover every winterization scenario, and you’ll need to match the method to your system’s layout and climate. For effective drain implementation, shut off the main supply, run a controller cycle with water off, then open each low‑point manual valve. Inspect drain components, especially backflow test ports, and lift check‑valve heads to purge trapped water. Automatic drains open when pressure falls below 10 PSI, but they won’t clear the mainline; you must still manually drain it and verify check valves for residual moisture. The blow‑out method forces water out with compressed air; start at the farthest zone, keep pressure below the lowest‑rated component’s limit, and use the proper adapter. Choose the method that guarantees complete water removal for your climate. A quick thaw can be achieved with a hair dryer to prevent pipe bursts. Water in exposed pipes can solidify when temperatures drop below 20 °F (‑6 °C), increasing the risk of pipe damage. Freezing temperatures can also cause sprinkler heads to crack if water remains trapped inside.

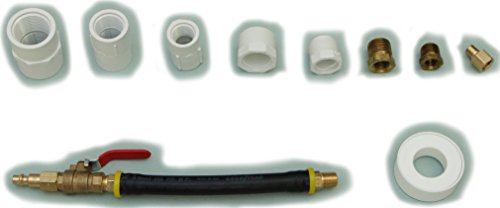
Blow out plug adapter fitting to winterize underground irrigation sprinkler systems, outdoor pipes, RV, boat, watercraft, motorhome, camper, travel trailer, water lines, homes, cabins, faucets, spigots, garden hoses, sillcocks, and hose bibbs by blow out method.

Blowout plug adapter fitting to easily winterize underground irrigation sprinkler systems, outdoor pipes, water lines, homes, cabins, faucets, spigots, garden hoses, sillcocks, and hose bibbs by blow out method.

HIGH-QUALITY MATERIAL: This RV Winterize Blowout Adapter is made from brass which is durable and it can withstand high temperature. Beside brass also resist corrosion. with sturdy construction.
Winterization Step‑by‑Step: Isolate and Shut Down Your Sprinkler System
If you want to protect your irrigation system from freezing, start by cutting off the water supply at the main shut‑off valve near the meter or backflow assembly, then turn off the controller to prevent any accidental activation. Next, locate the isolation valve that separates the backflow preventer from the house supply and close it completely. Verify that no water moves through the lines by opening test cocks at a 45‑degree angle and confirming that pressure has been relieved. Inspect the backflow device for cracks; any spray indicates damage that must be repaired before proceeding. Drain remaining water by opening drain plugs or sill cocks, siphoning from each valve, and loosening solenoids if automatic drain is available. These steps deliver the benefits of winterizing, while neglecting them leads to the effects of not winterizing—burst pipes, costly repairs, and system downtime. Ground can freeze up to 2‑3 feet deep in the Midwest. Properly burying sprinkler lines at optimal depth helps maintain consistent water pressure and protects against frost damage. Adjust the depth based on soil type to ensure adequate insulation and water distribution. Before you begin any digging for winterization, consider calling 811 to locate any underground utilities and avoid accidental damage.

IDEAL WINTERIZING KIT: TianPtion 17 inch Upgraded rv winterizing kit will prevent your equipment pipe system from breaking in cold weather due to water freezing when winter coming(include rv and sprinkler system pipes) through blow out pipe inside water; No need antifreeze, healthier and more environmentally friendly; Save a lot money & time
Adapter to winterize underground irrigation sprinkler systems.

For installation and maintenance of spray head sprinklers, nozzles, and risers
Protecting Valves, Pipes, and Sprinkler Heads From Ice Damage
Cutting off the water and isolating the system is only half the battle; you must now shield the valves, pipes, and heads from ice expansion that can shatter or burst them. Begin by applying freeze mitigation procedures to every valve: drain backflow preventers, insulate above‑ground units, and set ball valves at a 45° angle to keep water from pooling. For pipes, remove residual water with a blow‑out at 50 PSI for PVC or 30 PSI for polyethylene, then wrap exposed sections with temporary insulation or remove them if a freeze is imminent. Protect sprinkler heads by opening one head per zone to release pressure, then confirm drainage until a fine mist appears. Install automatic‑drain valves to meet annual maintenance requirements and eliminate manual intervention. Ensure all ball valves are left in the 45-degree position for winter. Follow these steps precisely to prevent cracks, splits, and costly spring repairs. Water‑resistant valve designs help mitigate moisture damage by reducing infiltration risks. Properly storing garden hoses indoors during winter can also prevent frost damage to the entire irrigation system. Adding a sturdy metal shield over exposed valves can further protect them from accidental impact and debris.
Winterization Timing by Region (North, Mountains, South, Texas)
When you plan winterization, start by checking regional temperature trends and set a target date at least one week before the first hard freeze; use air temperature monitoring to confirm the forecast. In the North—Massachusetts and southern New Hampshire—begin mid‑season winterization in late September, aiming to finish before temperatures consistently dip below 32 °F and at least one week before a 0 °F hard freeze. In mountain zones such as Broomfield, stop watering by October 30, then blow out lines before the frost level reaches pipe depth; maintain pipe temperatures above 40 °F. In the South, schedule between October 1 and December 15, draining before the first 32 °F night but avoiding early shutdown to preserve fall watering. In Texas, follow the same “first freeze or 32 °F” rule, extending to December if ground cooling lags, and adjust based on local patterns. It is also advisable to inspect valve seals before winterization to prevent leaks during freezing conditions. Local municipalities often publish a sprinkler ban calendar that details exact dates and any conditional extensions. Proper installation of a sprinkler backflow preventer is essential to safeguard water quality during winter operations.
When to Hire a Pro for Winterization: Scheduling Tips
After reviewing your regional timing, lock in a professional appointment well before the first predicted frost. Book early because irrigation pros fill their calendars weeks ahead; waiting reduces cost effective pricing options and forces inconvenient dates. When you schedule, request a system maintenance evaluation to confirm zone count, valve condition, and backflow device status. Choose a contractor with documented winterization experience and specialized blowout equipment; they’ll detect leaks or broken pipes that DIY attempts miss. Prioritize firms that bundle spring startup services, ensuring a seamless seasonal changeover. Allocate roughly five minutes per zone—an eight‑zone layout needs about 40 minutes—so the technician can fully evacuate water. This disciplined approach guarantees thorough protection and avoids costly freeze damage. Understanding the high material cost helps justify professional service. Knowing typical head replacement prices can also inform budgeting decisions. Selecting a compressor with the correct CFM rating ensures efficient water removal during blowouts.
Common Mistakes That Lead to Spring‑time Repairs and How to Avoid Them
Five common mistakes—incorrect valve closure, excessive air pressure, delayed winterization, neglected exposed components, and incomplete water removal—can all trigger costly spring repairs if you don’t address them properly. Close the mainline and dedicated valve fully; any residual water creates expansion cracks, so water overflow prevention starts with a firm seal. Calculate blow‑out pressure as total zone GPM ÷ 7.5 and stop the compressor once air clears the line; excess pressure breeds heat friction and pipe bursts. Schedule the blowout before the first frost; delay allows water to freeze and expand, cracking pipe walls. Disconnect hoses, insulate exposed pipe, and verify grading to eliminate low‑point moisture. Perform a thorough moisture inspection before freeze, then execute a complete drainage and final blow‑out to avoid trapped water pockets.

MULTIPURPOSE:The winterizing kit with shut off valve come with 3/4 male and female garden hose connector,When with male garden hose end is typically used to winterize recreational vehicles(RV), watercraft, garden hose, camper, boat and travel trailer. The fitting with female garden hose end is typically used to winterize sprinkler systems, garden hoses, and outdoor plumbing.

Waters your lawn automatically the whole season

Brass Material: Brass, for your health and safety, certified to contain less than 0.25% lead. Hose Material: EPDM Rubber, EXTRMELY durable, more excellent corrosion resistance
Quick Winterization Checklist Before the First Frost
Avoiding the costly spring repairs outlined earlier means you need a concise, actionable checklist before the first frost hits. First, shut off the water supply to all exterior faucets and spigots. Drain remaining water from each pipe, then leave faucet handles in the “on” position. Install insulated faucet protectors to block cold air. Next, clean gutters and downspouts of leaves, debris, and roof‑valley buildup; verify downspouts divert water away from the foundation. Inspect the roof for missing or curled shingles, trim overhanging branches, and confirm attic ventilation works. Seal doors and windows with fresh weather‑stripping and caulk; clean window tracks. Finally, service the HVAC system, replace furnace filters, and set ceiling fans to clockwise. This irrigation system maintenance and seasonal irrigation checklist secures your property before freezing temperatures arrive.

【Outdoor Faucet Covers】 You will receive 2 packs of thickened and upgraded outdoor faucet covers for winter freeze protection. Our spigot covers are made of waterproof fabric and high-thickness cotton for super insulation. The upgraded and thickened size has wide compatibility for most outdoor faucets. The drawstring ties are designed for your convenience and also fit to the wall to provide better insulation. The pipe insulation covers are easy to clean and reusable, saving you time and money.

Protects Pipes and Spigots from Freezing Temperatures

Enlarge Size – 10” height x 6.3” wide opening (26cm x 16cm), fits for most standard wall faucets. It is about one inch or two larger than most of other faucet covers, so that it can reach the side of your house, cover every inch of your outdoor spigot.


