First, shut off the main water supply, set the controller to rain mode, and open the zone valve manually to hear flow; if there’s no water, the supply may be blocked or the valve stuck. Next, check the valve’s pressure regulator for 55 psi static pressure and inspect the main supply valve for obstructions. Then, test the zone wiring with a multimeter: you should see 22‑28 V AC between zone and common and 20‑60 Ω coil resistance. If voltage and continuity are fine, examine the solenoid for cracks, corrosion, or a swollen coil, and listen for a click when you energize it. Finally, look inside the valve for debris, a torn diaphragm, or a jammed flow‑control screw. If you keep going, you’ll uncover the exact fix and when to call a professional.
Quickly Verify Water Supply to a Faulty Zone
Before you start troubleshooting a faulty zone, shut off the main water supply to the irrigation system, set the controller to rain mode or a drying period, and confirm the main shut‑off valve is fully closed. Next, isolate zone pipe breaks by capping all heads and marking pipe routes. Open the valve for the suspect zone manually and listen for flow; a lack of sound indicates a supply interruption. Attach a pressure gauge to the regulator faucet and verify static pressure—55 PSI is typical. If pressure reads low, inspect the main supply valve and pressure regulator for blockage. When pressure is normal but the zone remains dry, dig at the marked pipe intervals, checking for cracks, leaks, or broken sections. Replace any damaged pipe before retesting. Rattling noise may also indicate a malfunctioning valve. Some sprinkler valves incorporate built‑in pressure regulators to maintain consistent flow across varying supply pressures. Proper valve sizing helps ensure each zone receives adequate water flow. Understanding the solenoid operation can further aid in diagnosing electrical issues.

Maintains optimum 25 psi pressure and water flow to Drip lines and emitter devices

3/4" Y filter unit combines filtration and 30 psi pressure regulation in one piece

Connects 1/2" Dip tubing to any 3/4" male pipe threaded faucet or garden hose
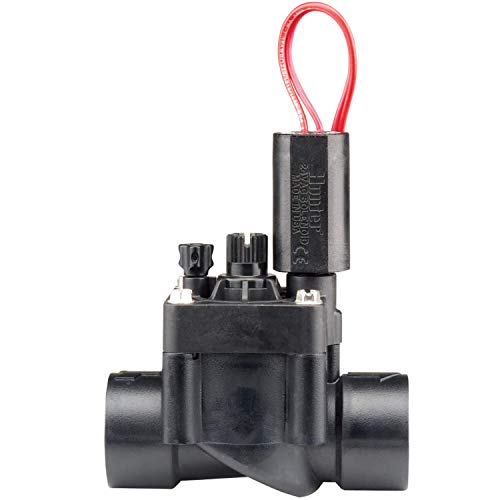
Typical Electrical Faults That Stop a Sprinkler Zone
After confirming the water supply is solid, turn your attention to the electrical side, because even a perfectly pressurized system won’t run if the valve’s coil never receives power. First, inspect the valve box for clogged valve filters that can impede airflow to the solenoid; clean them before testing. Next, examine all wiring for corrosion damage at the wiring, loose terminals, or broken conductors caused by shifting soil, roots, or recent repairs. Tighten any loose connections and replace corroded segments. Check the controller’s common wire for continuity; a loose common can silence multiple zones. Finally, verify that the transformer outputs 24‑28 V AC and that no fuse is blown or breaker tripped. Replace faulty parts and retest the zone. Also, measure the voltage at the control panel to ensure the non‑working zone receives the proper 20‑30 V. Understanding solenoid compatibility helps you select the right part for your specific sprinkler model. A damaged solenoid coil often produces a clicking noise when power is applied, indicating the coil is receiving voltage but cannot open the valve. Some DC‑powered solenoids are polarity‑sensitive, requiring correct wiring orientation for proper operation.

For replacing solenoids which open and close 24V automatic irrigation valves
BUILT-IN FLOW CONTROL FOR ZONE PRECISION: Control water flow to each irrigation zone and prevent overwatering. Helps improve system efficiency, reduce misting, and support healthier landscapes.
Residential / light commercial grade 1" female threaded inlet and outlet valve
Test Zone Wires With a Multimeter When a Sprinkler Zone Won’T Open
Wondering why a zone won’t pop up? Grab a multimeter, set it to AC voltage (V~), and connect the black lead to the COM terminal and the red lead to the problematic zone screw. Activate the zone manually; you should see 22‑28 V AC. If voltage is low, the controller is at fault. Next, turn off power, detach the zone wire, and switch to ohms. Measure continuity between the zone and common terminals; a beep or <10 Ω means the wire is intact, while OL or >70 Ω indicates a break. While the wire is disconnected, test resistance at the controller—20‑60 Ω is normal. If resistance is high, check splices in zone wires and inspect underground wire conduit for damage before proceeding to valve‑end verification. Properly sized low‑voltage AC supplies such as energy‑efficient power help maintain consistent valve operation. You can also locate the solenoid quickly by listening for a faint click when the system is activated and confirming coil voltage with a multimeter.
Diagnosing a Bad Solenoid: Step‑by‑Step Tests
If the zone wire checks out but the valve still won’t open, the next step is to inspect the solenoid itself. Begin with a visual inspection: look for cracks, corrosion, swollen coil, or frayed wires. Verify that terminals are tight and free of fluid contamination. Next, test coil resistance with a multimeter set to ohms. For a 24 V DC coil, expect 20–60 Ω; for a 220 V AC coil, 800–1600 Ω. Infinite resistance means an open coil, zero or near‑zero indicates a short—both require replacement. Measure voltage across the terminals while the zone energizes; it should match the supply (e.g., 12.4–12.8 V). Finally, perform an activation test: apply power with jumper wires and listen for a click. No click confirms a faulty coil. Document results, follow solenoid maintenance requirements, and weigh field replacement considerations before installing a new unit. Hunter’s valves are known for their robust construction and resistance to corrosion, which can help prevent premature solenoid failure. Regularly monitoring water pressure can also extend the overall lifespan of the sprinkler system. Proper water quality management reduces mineral buildup that can degrade valve components over time.

Captive hex plunger feature

Wide Compatibility: this irrigation valve solenoid compatible with Hunter PGV & ICV irrigation valves, which ensures reliable performance in automatic lawn sprinkler systems and garden irrigation setups

Compatibility: Compatible with Hunter NODE /NODE-BT /XC Hybrid 9V DC Battery Powered Controllers Irrigation Systems, this DC latching solenoid is ideal for any battery operated irrigation system, especially in areas without AC power
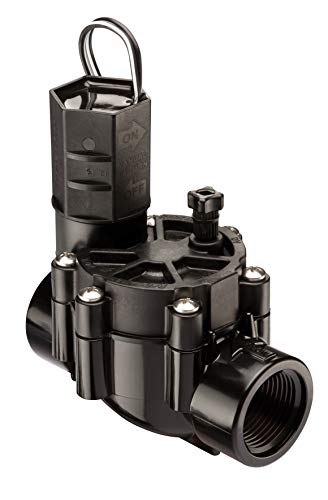
Mechanical Valve Failures That Stop a Zone From Opening
Why do your zones stay dead? First, inspect the valve diaphragm for debris. Dirt, rocks, or sediment can jam the diaphragm, preventing it from lifting. Clear any blockage in the solenoid chamber and plunger, then verify the bleed screw turns freely. Next, examine the diaphragm itself; a torn or worn diaphragm loses lift, so replace it with a rebuild kit if needed. Check the flow‑control screw—if it’s fully tightened, it restricts pressure and mimics faulty pressure regulation; loosen it counter‑clockwise to restore flow. Finally, look for internal damage: missing plunger springs, damaged O‑rings, or stuck bonnet ports. Removing these obstructions restores operation and prevents clogged sprinkler heads from staying closed. Check voltage at the terminal block to ensure the solenoid is receiving power. If you notice uneven watering across the lawn, it often points to a clogged or failing valve. Regularly clean the valve’s internal passages to avoid seal wear that can cause leaks. The valve’s transparent cover lets you see the diaphragm and piston clearly.
Decide Whether to Replace the Valve or Repair the Solenoid for a Sprinkler Zone That Won’t Open
When a zone won’t pop up, start by confirming whether the problem lies in the solenoid or the valve itself. First, test the solenoid with a 9‑volt battery; a click means it’s alive. Measure resistance and verify at least 17 V during activation. If the solenoid fails the battery or voltage test, replace it—cost is about $20. If it clicks, open the bleed screw; water flow indicates the valve is mechanically sound. Next, perform diaphragm cleaning techniques: remove the valve, inspect for particles, and clean the diaphragm. If the diaphragm is torn or debris‑blocked, replace the valve. Use zone leak diagnosis to check for low‑head leaks that signal diaphragm failure. Choose replacement when manual tests isolate a mechanical fault; otherwise, repair the solenoid. Debris blockage can also prevent the valve from opening properly. Ensure the solenoid’s voltage rating matches the controller’s output to avoid insufficient activation.

Captive hex plunger feature

Threaded bonnet design - Allows easy servicing without removal from the system
DIY Sprinkler Zone Fixes and When to Call a Pro
After confirming whether the solenoid or valve is at fault, you can move on to practical DIY fixes that often resolve a non‑popping zone without professional help. First, verify the water supply: open the main valve, guarantee no shut‑off valves are closed, and check pressure at the zone manifold. Inspect wiring for loose or corroded terminals, measure voltage, and bypass damaged sections with spare wire. Test the solenoid by twisting it, measuring resistance, and confirming voltage during activation; waterproof connections afterward. Clean clogged heads: turn off water, lift the riser, rinse the filter, reinstall, and replace damaged filters. Adjust or replace heads to optimize head spacing and coverage. If pressure remains low, leaks persist, or electrical tests fail, call a pro. Ensure the sprinkler is set to the desired 180 degree pattern] and lock it in place. Optimizing coverage can prevent dry spots and improve overall system performance. Regularly check for debris buildup in the nozzle to maintain consistent water flow. Understanding the sprinkler valve operation helps diagnose why a zone may not activate. Modern systems often use solenoid valves to enable electronic control of each zone.

Replacement solenoid for Rain Bird APAS, ASVF, ECV, CP, CPF model valves

For replacing solenoids which open and close 24V automatic irrigation valves


